Jinja is a powerful template engine commonly used in Python web applications to create dynamic web pages. Jinja also supports standalone usage, enabling you to create text files with programmatically filled content, making it versatile beyond web frameworks like Flask and Django.
In this tutorial, you’ll learn how to install Jinja, create and render Jinja templates, and use Jinja’s features such as conditional statements and loops. You’ll also explore how to use filters and macros to enhance your templates’ functionality, and discover how to nest templates and integrate Jinja seamlessly into a Flask web application.
By the end of this tutorial, you’ll understand that:
- Jinja is used to create dynamic web templates and generate text files with programmatic content.
- A templating engine processes templates with dynamic content, rendering them as static pages.
- You use Jinja templates in HTML by embedding dynamic placeholders and rendering them with Python.
- You create an
if-elsestatement in Jinja using{% if condition %} ... {% else %} ... {% endif %}. - You create a
forloop in Jinja using{% for item in list %} ... {% endfor %}. - Jinja is primarily used in Python but can be integrated with other languages and frameworks.
You’ll start by using Jinja on its own to cover the basics of Jinja templating. Later you’ll build a basic Flask web project with two pages and a navigation bar to leverage the full potential of Jinja.
Throughout the tutorial, you’ll build an example app that showcases some of Jinja’s wide range of features. To see what it’ll do, skip ahead to the final section.
You can also find the full source code of the web project by clicking on the link below:
Source Code: Click here to download the source code that you’ll use to explore Jinja’s capabilities.
Take the Quiz: Test your knowledge with our interactive “Primer on Jinja Templating” quiz. You’ll receive a score upon completion to help you track your learning progress:
Interactive Quiz
Primer on Jinja TemplatingIn this quiz, you'll test your understanding of Jinja templating. Jinja is a powerful tool for building rich templates in Python web applications, and it can also be used to create text files with programmatic content.
Get Started With Jinja
Jinja is not only a city in the Eastern Region of Uganda and a Japanese temple, but also a template engine. You commonly use template engines for web templates that receive dynamic content from the back end and render it as a static page in the front end.
But you can use Jinja without a web framework running in the background. That’s exactly what you’ll do in this section. Specifically, you’ll install Jinja and build your first templates.
Install Jinja
Before exploring any new package, it’s a good idea to create and activate a virtual environment. That way, you’re installing any project dependencies in your project’s virtual environment instead of system-wide.
Select your operating system below and use your platform-specific command to set up a virtual environment:
With the above commands, you create and activate a virtual environment named venv by using Python’s built-in venv module.
The parentheses (()) surrounding venv in front of the prompt indicate that you’ve successfully activated the virtual environment.
After you’ve created and activated your virtual environment, it’s time to install Jinja with pip:
(venv) $ python -m pip install Jinja2
Don’t forget the 2 at the end of the package name.
Otherwise, you’ll install an old version that isn’t compatible with Python 3.
It’s worth noting that although the current major version is actually greater than 2, the package that you’ll install is nevertheless called Jinja2.
You can verify that you’ve installed a modern version of Jinja by running pip list:
(venv) $ python -m pip list
Package    Version
---------- -------
Jinja2     3.x
...
To make things even more confusing, after installing Jinja with an uppercase J, you have to import it with a lowercase j in Python.
Try it out by opening the interactive Python interpreter and running the following commands:
>>> import Jinja2
Traceback (most recent call last):
  ...
ModuleNotFoundError: No module named 'Jinja2'

>>> import jinja2
>>> # No error
When you try to import Jinja2, with the uppercase naming that you used to install Jinja, then you raise a ModuleNotFoundError.
To import the Jinja package to Python, you must type jinja2 with a lowercase j.
Render Your First Jinja Template
With Jinja imported, you can go on to load and render your first template:
>>> import jinja2
>>> environment = jinja2.Environment()
>>> template = environment.from_string("Hello, {{ name }}!")
>>> template.render(name="World")
'Hello, World!'
The core component of Jinja is the Environment() class.
In this example, you create a Jinja environment without any arguments.
Later you’ll change the parameters of Environment to customize your environment.
Here, you’re creating a plain environment where you load the string "Hello, {{ name }}!" as a template.
What you just did may not seem much more impressive than using a formatted string in plain Python. However, this example shows two important steps that you usually perform when using Jinja:
- Load a template: Load a source that contains placeholder variables. By default, they’re wrapped in a pair of double curly brackets (
{{ }}). - Render the template: Fill the placeholders with content. You can provide a dictionary or keyword arguments as context. In this case, you’ve filled the placeholder so that you get the familiar
Hello, World!as output.
The source template that you’re loading can be a literal string. But things get way more interesting when you work with files and provide a text file as a template.
Use an External File as a Template
If you want to follow along with the examples in this tutorial, then you can go ahead and create a new folder to work in.
Inside your working directory, create a folder named templates/.
You’ll store any upcoming templates in the templates/ folder.
Now create a text file named message.txt:
templates/message.txt
Hello {{ name }}!

I'm happy to inform you that you did very well on today's {{ test_name }}.
You reached {{ score }} out of {{ max_score }} points.

See you tomorrow!
Anke
Imagine that you’re a teacher who wants to send results to well-performing students.
The message.txt template contains a blueprint for the message, which you can copy and paste to send later.
Just like in the Hello, World! example, you find curly braces ({{ }}) in your template’s text.
Next, create a Python file named write_messages.py:
write_messages.py
from jinja2 import Environment, FileSystemLoader

max_score = 100
test_name = "Python Challenge"
students = [
    {"name": "Sandrine",  "score": 100},
    {"name": "Gergeley", "score": 87},
    {"name": "Frieda", "score": 92},
]

environment = Environment(loader=FileSystemLoader("templates/"))
template = environment.get_template("message.txt")

for student in students:
    filename = f"message_{student['name'].lower()}.txt"
    content = template.render(
        student,
        max_score=max_score,
        test_name=test_name
    )
    with open(filename, mode="w", encoding="utf-8") as message:
        message.write(content)
        print(f"... wrote {filename}")
When you create a Jinja environment with FileSystemLoader, you can pass the path that points to the folder of your templates.
Instead of passing in a string, you now load message.txt as your template.
Once your template is loaded, you can use it over and over again to fill it with content.
In write_messages.py, you render name and score for each of your top students into a text file.
Note that the keys of the students dictionary, along with max_score and test_name, match the template variables in message.txt.
If you don’t provide context for the variables in a template, they don’t throw an error.
But they render an empty string, which is usually not desired.
When you call template.render(), you return the rendered template as a string.
As with any other string, you can use .write() to write it into a file.
To see write_messages.py in action, run the script:
(venv) $ python write_messages.py
... wrote message_sandrine.txt
... wrote message_gergeley.txt
... wrote message_frieda.txt
You just created a file for each of your students.
Have a look at message_gergeley.txt, for example:
message_gergeley.txt
Hello Gergeley!

I'm happy to inform you that you did very well on today's Python Challenge.
You reached 87 out of 100 points.

See you tomorrow!
Anke
The variables of your message.txt template successfully received your student’s data.
What a great way of getting Python and Jinja to work for you!
You can now copy and paste the text, send it to your students, and save yourself some work.
Control the Flow in Jinja
So far, you’ve added placeholder variables to the template text and rendered values into it.
In this section, you’ll learn how to add if statements and for loops to a template to conditionally render content without repeating yourself.
Use if Statements
In the example from the previous section, you programmatically created customized messages for your top students.
Now it’s time to consider all of your students.
Add two students with lower scores to students in write_messages.py:
write_messages.py
# ...

students = [
    {"name": "Sandrine",  "score": 100},
    {"name": "Gergeley", "score": 87},
    {"name": "Frieda", "score": 92},
    {"name": "Fritz", "score": 40},
    {"name": "Sirius", "score": 75},
]

# ...
You add the scores of Fritz and Sirius to the students list.
Unlike the other students, both performed below eighty points.
Use the 80 mark to create a conditional statement in message.txt:
templates/message.txt
 1Hello {{ name }}!
 2
 3{% if score > 80 %}
 4I'm happy to inform you that you did very well on today's {{ test_name }}.
 5{% else %}
 6I'm sorry to inform you that you did not do so well on today's {{ test_name }}.
 7{% endif %}
 8You reached {{ score }} out of {{ max_score }} points.
 9
10See you tomorrow!
11Anke
In addition to the variables that you used before, you’re now also using a conditional statement with a Jinja block.
Instead of using a pair of double curly braces, you create Jinja blocks with one curly brace and a percent sign ({% %}) on each end.
While you can think of the normal variables as substrings, Jinja blocks wrap a larger section of your template.
That’s why you also need to tell Jinja where your block ends.
To close a block, you use the exact same keywords again, with an end prefix.
In the example above, you’re starting an {% if %} block in line 3, which you close in line 7 with {% endif %}.
The if statement itself works like conditional statements in Python.
In line 3, you’re checking if score is higher than 80.
If so, then you’re rendering a happy message.
Otherwise, you render an apologetic message in line 6.
In the example above, the students agreed that they wanted eighty points as the benchmark for their Python challenge performance.
Feel free to change 80 to any score that makes you and your students more comfortable.
Leverage for Loops
You can also control the flow of your templates with for loops.
As an example, you decide to create an HTML page for your students that displays all results.
Note that all students have consented to show their results openly in this friendly competition.
Create a new file named results.html in your templates/ directory:
templates/results.html
<!DOCTYPE html>
<html lang="en">
<head>
  <meta charset="utf-8">
  <title>Results</title>
</head>

<body>
  <h1>{{ test_name }} Results</h1>
  <ul>
  {% for student in students %}
    <li>
      <em>{{ student.name }}:</em> {{ student.score }}/{{ max_score }}
    </li>
  {% endfor %}
  </ul>
</body>
</html>
Here you’re creating an HTML page that loops through your students dictionary and displays their performance.
Just like with the {% if %} blocks, you have to make sure that you close your {% for %} block with {% endfor %}.
You can combine if statements and for loops to control the flow of your templates even further:
templates/results.html
{# ... #}

{% for student in students %}
  <li>
    {% if student.score > 80 %}🙂{% else %}🙁{% endif %}
    <em>{{ student.name }}:</em> {{ student.score }}/{{ max_score }}
  </li>
{% endfor %}

{# ... #}
Depending on a student’s score, you show a smiling or a sad face emoji. Note that you can put the block expressions on a single line, too.
Go on and update write_messages.py:
write_messages.py
# ...

results_filename = "students_results.html"
results_template = environment.get_template("results.html")
context = {
    "students": students,
    "test_name": test_name,
    "max_score": max_score,
}
with open(results_filename, mode="w", encoding="utf-8") as results:
    results.write(results_template.render(context))
    print(f"... wrote {results_filename}")
In addition to the for loop where you saved a message for each student, you’re now also writing a single HTML file containing all the results for that student.
This time you’re creating a context dictionary that holds all the variables that you pass into the template.
Note: Using context as a name for the collection that stores the variables for a template is a convention. That said, you can name the dictionary differently if you prefer.
With a dictionary that contains all of your template’s context, you can call .render() with context as the only argument.
When you run write_messages.py, you also create an HTML file:
(venv) $ python write_messages.py
... wrote message_sandrine.txt
... wrote message_gergeley.txt
... wrote message_frieda.txt
... wrote message_fritz.txt
... wrote message_sirius.txt
... wrote students_results.html
You can view the rendered HTML file in your code editor. However, since you’re working with HTML now, you can also have a look at the file in your browser:

Like in Python scripts, you can control the flow of Jinja templates with the if statement and for loops.
In Jinja, you’re using blocks to wrap content.
When you’re using a for block, then the content within that block gets rendered in each step of the loop.
With templates, you can create building blocks for larger websites without duplicating your front-end code. That’s why web frameworks like Flask leverage the power of Jinja templates. In the next section, you’ll learn how to use Flask to render data from the back end into the web pages of the front end.
Use Jinja With Flask
Chances are that you first heard of Jinja when you used a web framework like Flask. Both Jinja and Flask are maintained by Pallets Project, a community-driven organization that takes care of Python libraries that power the Flask web framework.
In this section, you’ll continue the examples from before by creating a basic web application for your students.
Install Flask
You can continue working in the same directory and virtual environment that you created in the previous section. When you’re in your active virtual environment, go on and install Flask:
(venv) $ python -m pip install flask
With Flask installed, continue to create your first route to verify that Flask works as expected.
Create a file named app.py in your project’s root directory:
app.py
from flask import Flask
app = Flask(__name__)
@app.route("/")
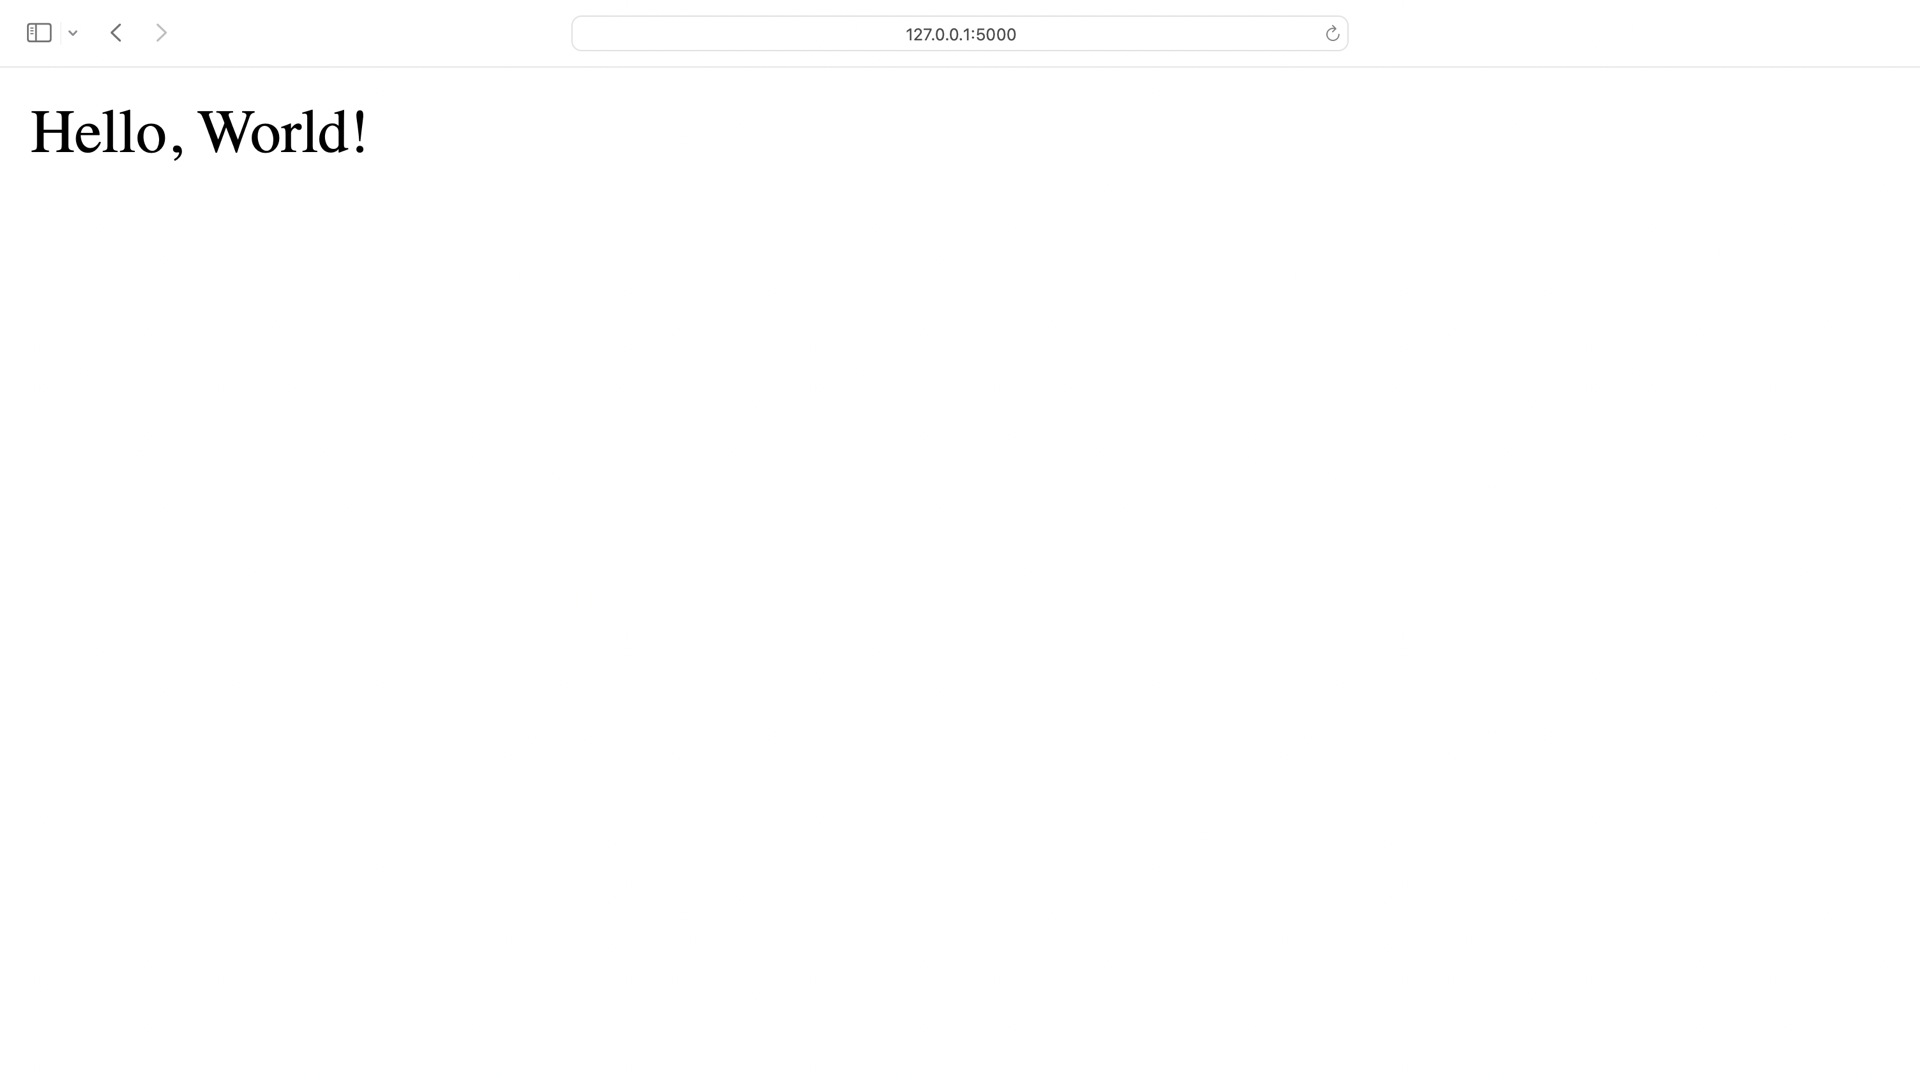
def home():
return "Hello, World!"
if __name__ == "__main__":
app.run(debug=True)
When you put an @app.route() decorator on top of a Flask view function, you register it with the given URL rule.
Here, you’re establishing the route /, which returns Hello, World!.
To see your home page in the browser, start your Flask development web server:
(venv) $ python app.py
...
 * Debug mode: on
 * Running on http://127.0.0.1:5000 (Press CTRL+C to quit)
 * Restarting with watchdog (fsevents)
 * Debugger is active!
Now your Flask app is running in debug mode.
In debug mode, you’ll get more meaningful error messages if something goes wrong.
Also, your server will restart automatically whenever you change something in your codebase.
To see your home page, visit http://127.0.0.1:5000:
Awesome, you now have a running Flask app! In the next section, you’ll implement Jinja templates in your Flask app.
Add a Base Template
So far, your Flask app returns a string. You could enhance your string by adding HTML code, and Flask would render it for you. But as you learned in the previous section, using templates makes rendering content much more convenient for you.
Create a new template named base.html in your templates/ directory:
templates/base.html
 1<!DOCTYPE html>
 2<html lang="en">
 3<head>
 4  <meta charset="utf-8">
 5  <title>{{ title }}</title>
 6</head>
 7
 8<body>
 9  <h1>Welcome to {{ title }}!</h1>
10</body>
11</html>
In base.html, you have two occurrences where you use template variables:
once in line 5 and then again in line 9.
To render and serve base.html, load it as your home page in app.py:
app.py
from flask import Flask, render_template

app = Flask(__name__)

@app.route("/")
def home():
    return render_template("base.html", title="Jinja and Flask")

# ...
By default, Flask expects your templates in a templates/ directory.
Therefore, you don’t need to set the template directory explicitly.
When you provide base.html to render_template(), Flask knows where to look for your template.
Note: Usually, you’d improve your website’s look with CSS and add some functionality with JavaScript. Because you’re focusing on the content structure in this tutorial, you’ll keep your web app mostly unstyled.
Restart your Flask development server if it hasn’t updated automatically already.
Then visit http://127.0.0.1:5000 and verify that Flask serves and renders your base template:
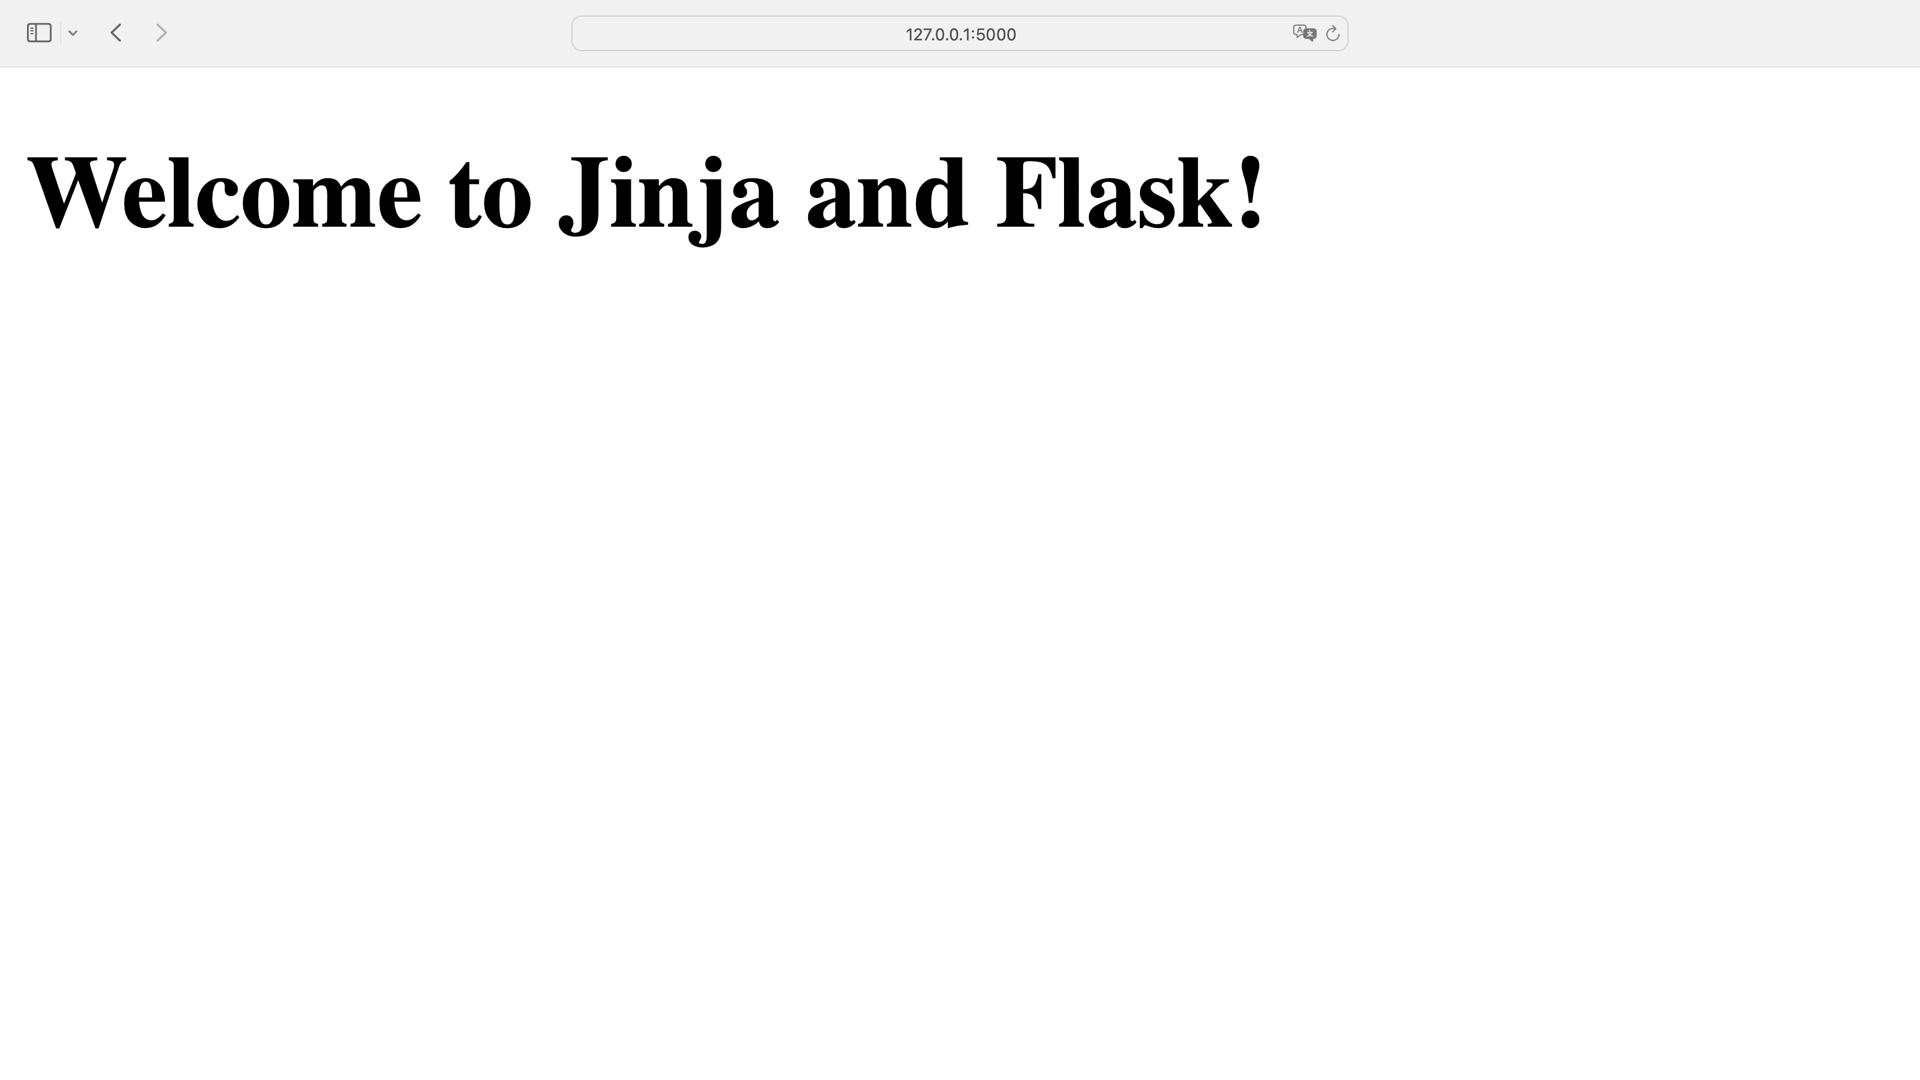
Flask rendered the title variable in your website’s title and in the welcome message.
Next, you’ll create a page to show your students’ results.
Add Another Page
In one of the earlier sections, you used results.html as a template to generate a file named students_results.html.
Now that you’ve got a web app, you can use results.html to render your template dynamically without saving it to a new file this time.
Make sure that results.html is placed in templates/ and looks like this:
templates/results.html
 1<!DOCTYPE html>
 2<html lang="en">
 3<head>
 4  <meta charset="utf-8">
 5  <title>{{ title }}</title>
 6</head>
 7
 8<body>
 9  <h1>{{ test_name }} {{ title }}</h1>
10  <ul>
11  {% for student in students %}
12    <li>
13      {% if student.score > 80 %}🙂{% else %}🙁{% endif %}
14      <em>{{ student.name }}:</em> {{ student.score }}/{{ max_score }}
15    </li>
16  {% endfor %}
17  </ul>
18</body>
19</html>
The only adjustments to the earlier version are highlighted above:
- Line 5 adds a dynamic page title.
- Line 9 enhances the first headline.
To access the results page in your web app, you must create a route.
Add the following code to app.py:
app.py
# ...

max_score = 100
test_name = "Python Challenge"
students = [
    {"name": "Sandrine",  "score": 100},
    {"name": "Gergeley", "score": 87},
    {"name": "Frieda", "score": 92},
    {"name": "Fritz", "score": 40},
    {"name": "Sirius", "score": 75},
]

@app.route("/results")
def results():
    context = {
        "title": "Results",
        "students": students,
        "test_name": test_name,
        "max_score": max_score,
    }
    return render_template("results.html", **context)

# ...
In a full-fledged web app, you’d probably store data in an external database.
For now, you keep max_score, test_name, and students next to results().
Flask’s render_template() accepts only one positional argument, which is the template name.
Any other arguments must be keyword arguments.
So you have to unpack your dictionary with two asterisks (**) in front of context.
With the asterisk operators, you’re passing the items of context as keyword arguments into render_template().
When you visit http://127.0.0.1:5000/results in your browser, Flask serves results.html with the rendered context.
Hop over to the browser and take a look at it:
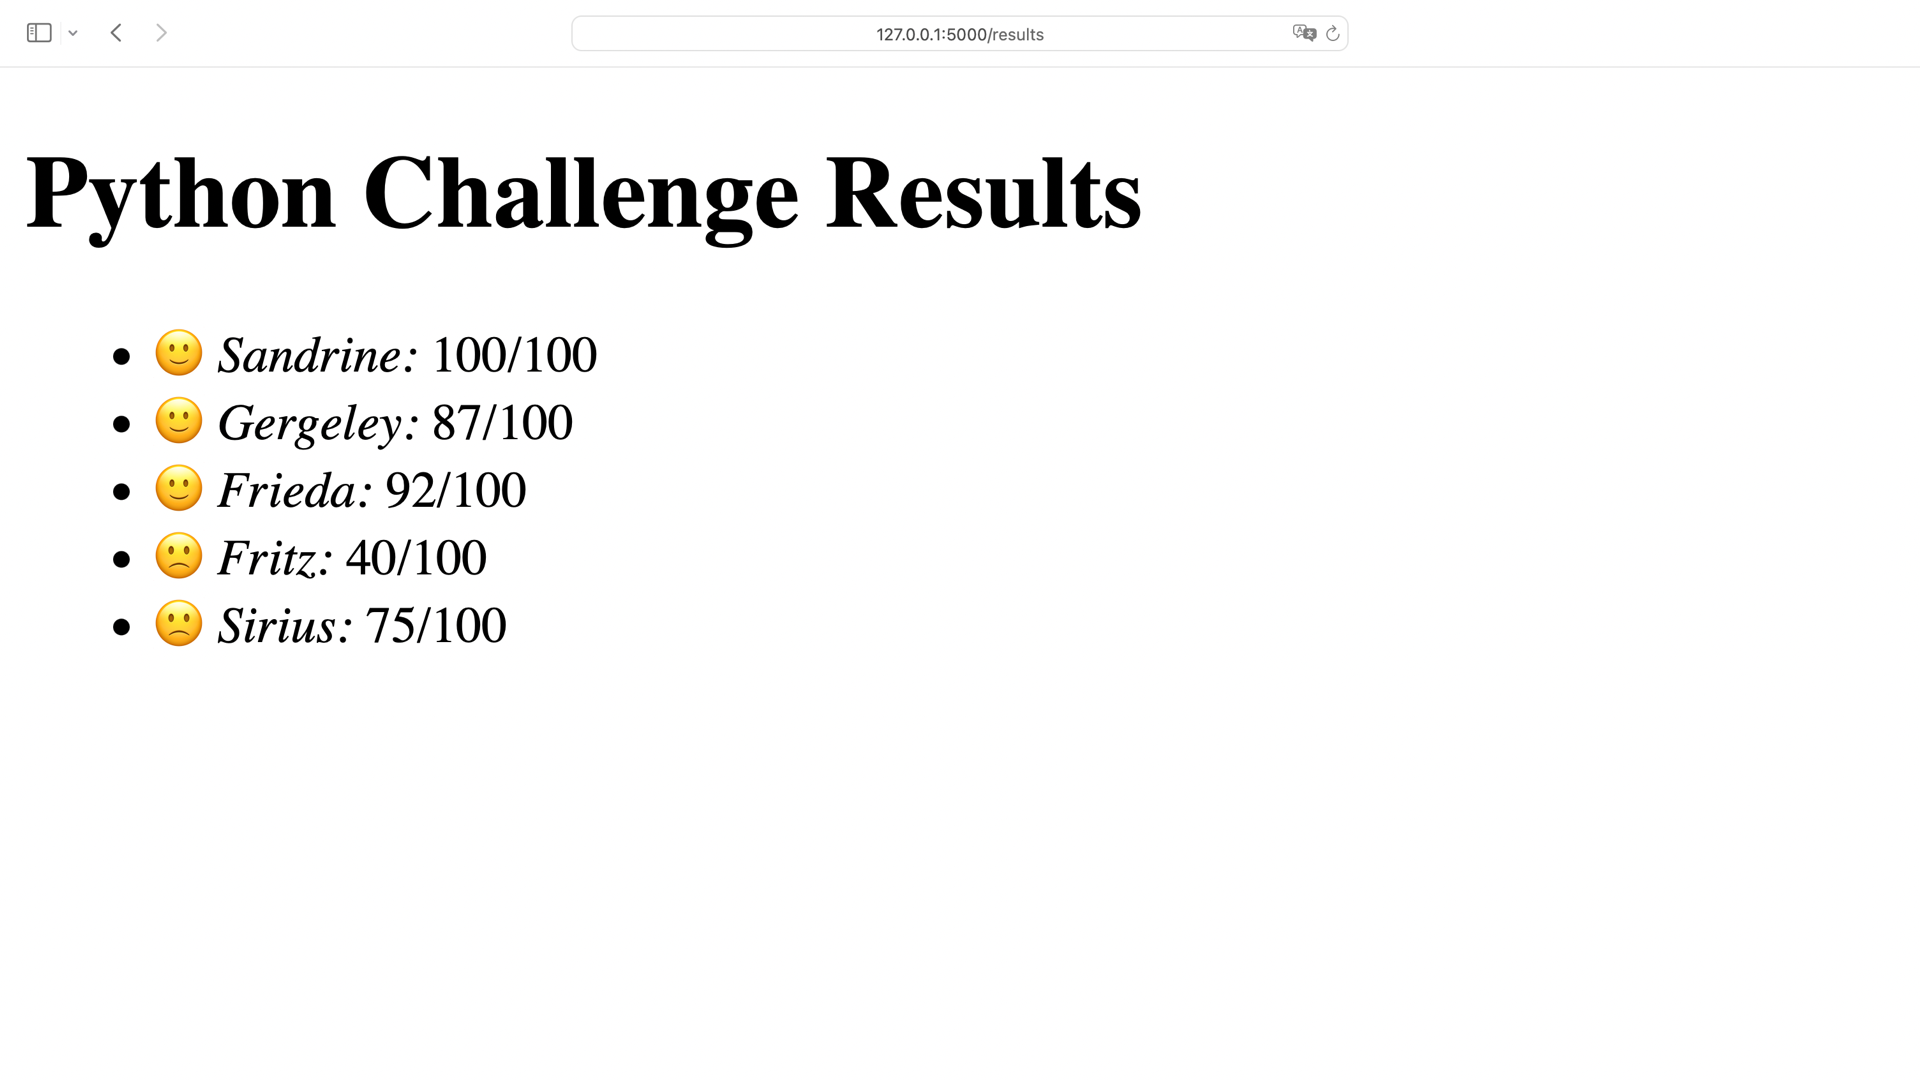
You now have a home page and a page that shows your students’ results. That’s a great start for a web app!
In the next section, you’ll learn how to leverage the power of your templates even more by nesting them. You’ll also add a navigation menu to your project so that users can conveniently jump from page to page.
Nest Your Templates
As your application grows and you continue adding new templates, you must keep common code in sync.
So far, your two templates, base.html and results.html, look very similar.
When multiple templates contain the same code, you need to adjust every template if you change any of the common code.
In this section, you’ll implement a parent and child template structure that’ll make your code much more maintainable.
Adjust Your Base Template
When you use Jinja’s template inheritance, you can move the common structure of your web app to a parent base template and let child templates inherit that code.
Your base.html is almost ready to serve as your base template.
To make your base template extendable, add some {% block %} tags to the structure:
templates/base.html
<!DOCTYPE html>
<html lang="en">
<head>
  <meta charset="utf-8">
  <title>{% block title %}{{ title }}{% endblock title %}</title>
</head>

<body>
  {% block content %}
    <h1>Welcome to {{ title }}!</h1>
  {% endblock content %}
</body>
</html>
You use the {% block %} tag to define which parts of your base template may be overridden by child templates.
Just like with {% if %} and {% for %}, you must close your blocks with {% endblock %}.
Note that you also name your blocks.
With the title argument, you allow a child template to replace the code between {% block title %} and {% endblock title %} with its own title block.
You can replace the code of {% block content %} with a content block.
Note: The names of your content blocks must be unique inside each template. Otherwise, Jinja will get confused about which block to choose for replacements.
The content that you have in between the {% block %} tags in base.html is a placeholder.
The fallback content shows whenever a child template doesn’t contain the corresponding {% block %} tags.
You can also decide not to add fallback content in between {% block %} tags.
As with variables in templates, Jinja won’t complain if you don’t provide content for them.
Instead, Jinja will render an empty string.
In base.html, you provide fallback content for your template blocks.
Therefore, you don’t need to change anything in your home() view.
It’ll work the same way as before.
In the next section, you’ll prepare your child template to work with base.html.
Extend Child Templates
You currently have a results.html template that works independently, without a parent template.
That means that you can now adjust the code of results.html to connect it with base.html:
templates/results.html
 1{% extends "base.html" %}
 2
 3{% block content %}
 4<h1>{{ test_name }} {{ title }}</h1>
 5<ul>
 6{% for student in students %}
 7  <li>
 8    {% if student.score > 80 %}🙂{% else %}🙁{% endif %}
 9    <em>{{ student.name }}:</em> {{ student.score }}/{{ max_score }}
10  </li>
11{% endfor %}
12</ul>
13{% endblock content %}
To connect the child template with its parent template, you must add an {% extends %} tag at the top of the file.
Child templates also contain {% block %} tags.
By providing the block’s name as an argument, you’re connecting the blocks from the child template with the blocks from the parent template.
Note that results.html doesn’t contain a title block.
But your page will still display the correct title, because it uses the fallback content in base.html and the view provides a title variable.
You don’t need to adjust your results() view.
When you visit http://127.0.0.1:5000/results, you should notice no changes.
The rendered page contains the root code of base.html and the fill-ins from the block of results.html.
Keep in mind that any content outside the child template’s blocks won’t appear on your rendered page.
For example, if you want to add navigation to results.html that links back to your home page, then you must either define a new placeholder block in base.html or add the navigation menu to the structure of base.html.
Include a Navigation Menu
The navigation of a website is usually displayed on every page.
With your base and child template structure, it’s best to add the code for the navigation menu into base.html.
Instead of adding the navigation menu code directly into base.html, you can leverage the {% include %} tag.
By referencing another template with {% include %}, you’re loading the whole template into that position.
Included templates are partials that contain a fraction of the full HTML code.
To indicate that a template is meant to be included, you can prefix its name with an underscore (_).
Follow the prefix-based naming scheme and create a new template named _navigation.html in your templates/ folder:
templates/_navigation.html
<nav>
{% for menu_item in ["home", "results"] %}
  <a href="{{ url_for(menu_item) }}">{{ menu_item }}</a>
{% endfor %}
</nav>
Note that _navigation.html contains neither an {% extends %} tag nor any {% block %} tags.
You can focus solely on how you want to render your navigation menu.
When you use url_for(), Flask creates the full URL to the given view for you.
So even when you decide to change the route to one of your pages, the navigation menu will still work.
Include _navigation.html in base.html to display your navigation menu on all of your pages:
templates/base.html
<!DOCTYPE html>
<html lang="en">
<head>
  <meta charset="utf-8">
  <title>{% block title %}{{ title }}{% endblock title %}</title>
</head>

<body>
  <header>
    {% include "_navigation.html" %}
  </header>
  {% block content %}
    <h1>Welcome to {{ title }}!</h1>
  {% endblock content %}
</body>
</html>
Instead of adding the navigation menu code directly into base.html, you include _navigation.html into your website’s header.
Since results.html extends base.html, you can visit http://127.0.0.1:5000/results to check out your new navigation menu:
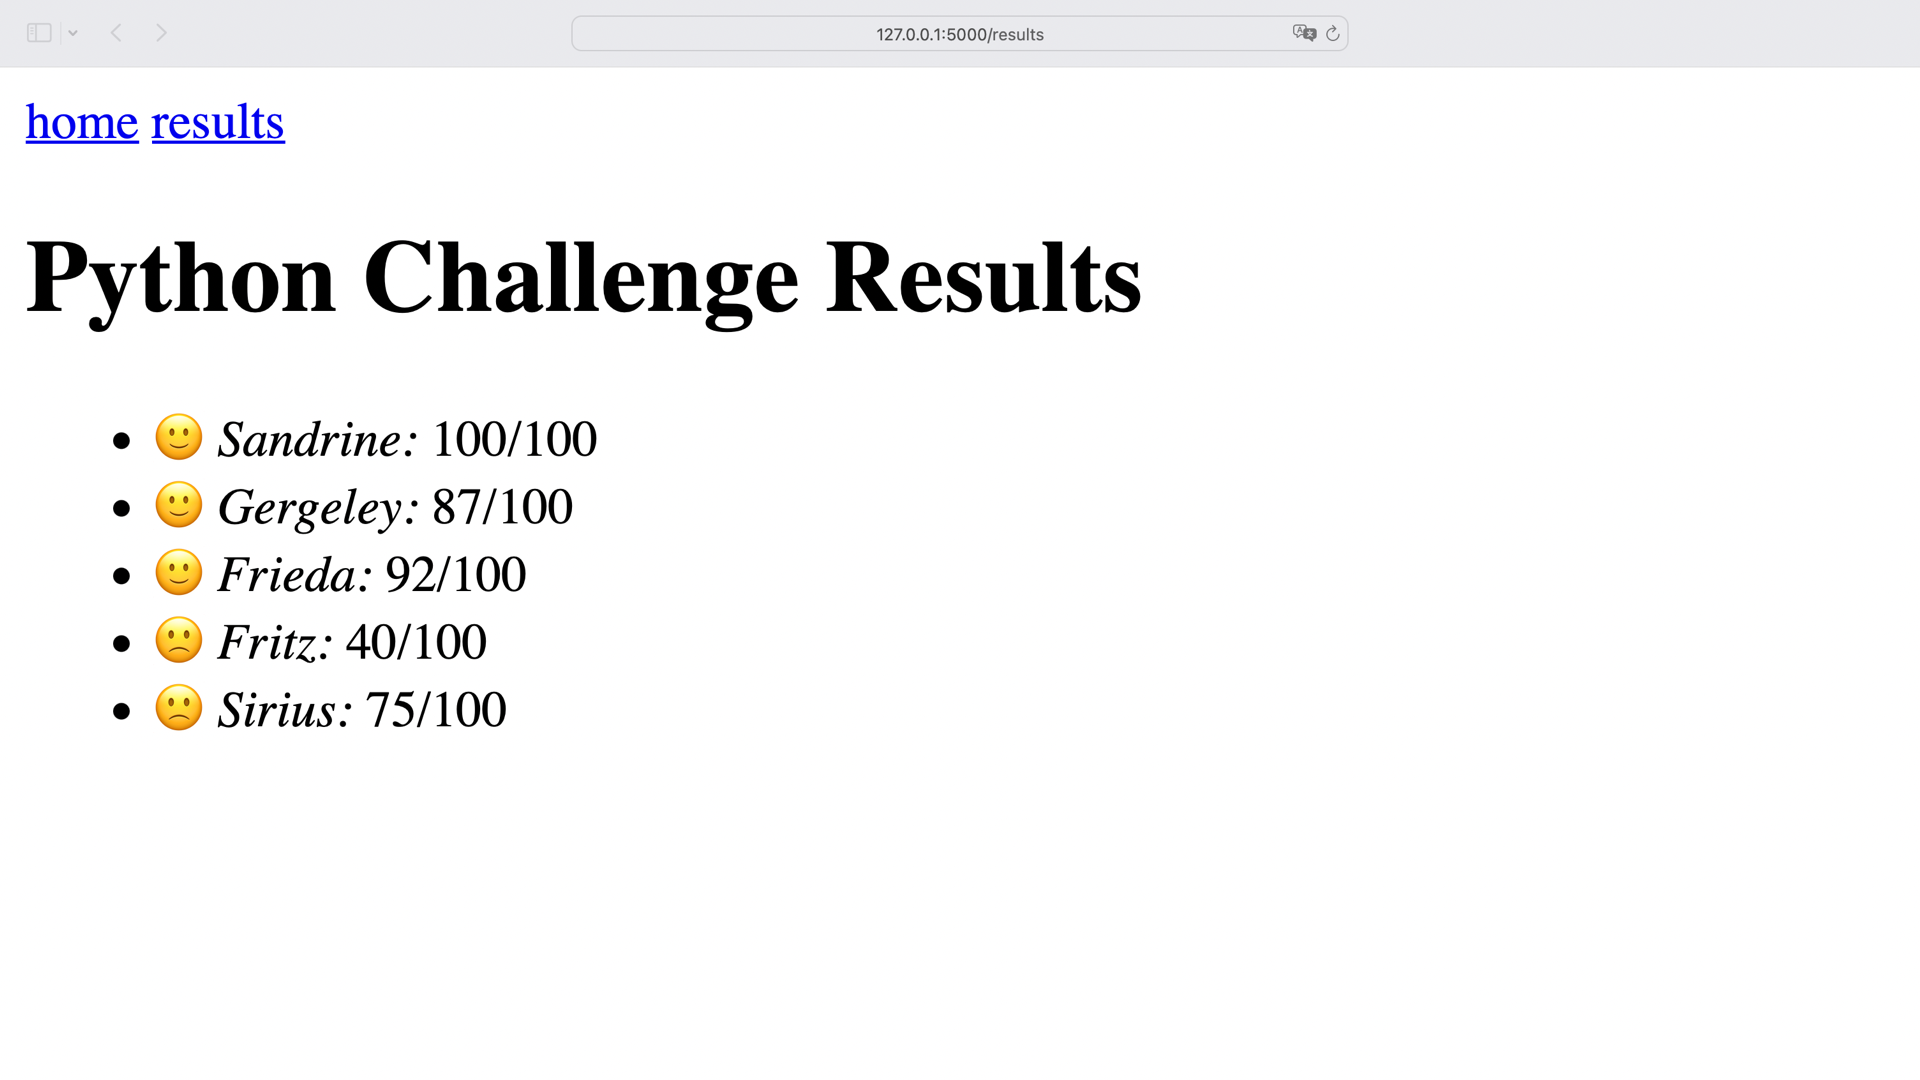
Your results page inherits the code from your base template. When you click a link in the navigation menu, the URL in your address bar changes based on your current page.
Apply Filters
Take a moment and think of a situation where another person takes care of the back end, and your responsibility is the front end of the website.
To avoid interfering with each other, you’re not allowed to adjust any views in app.py or change the data that arrives in your templates.
After a conversation with your students, you agree that your web app could be improved. You come up with two features:
- Display the navigation menu items in uppercase.
- Sort your students’ names in
results.htmlalphabetically.
You’ll use Jinja’s filter functionality to implement both features without touching the back end.
Adjust Your Menu Items
Jinja provides a bunch of built-in filters. If you check them out, then you’ll notice that they look similar to Python’s built-in functions and string methods.
Before you continue, revisit your _navigation.html partial:
templates/_navigation.html
<nav>
{% for menu_item in ["home", "results"] %}
  <a href="{{ url_for(menu_item) }}">{{ menu_item }}</a>
{% endfor %}
</nav>
Currently, your menu items are displayed in lowercase to match the name of the view.
If menu_item weren’t lowercase, then the link wouldn’t work.
That means menu_item in the href attribute must stay as it is.
However, you can adjust the display of menu_item inside of the <a> tags:
templates/_navigation.html
<nav>
{% for menu_item in ["home", "results"] %}
  <a href="{{ url_for(menu_item) }}">{{ menu_item|upper }}</a>
{% endfor %}
</nav>
You specify the variable and then a pipe symbol (|), followed by the filter.
In some cases, you can specify arguments in parentheses.
In your navigation menu, you hand over the menu_item variable to the upper filter.
Like Python’s .upper() string method, Jinja’s upper filter returns the variable in uppercase letters.
Visit http://127.0.0.1:5000 to see your changes live:
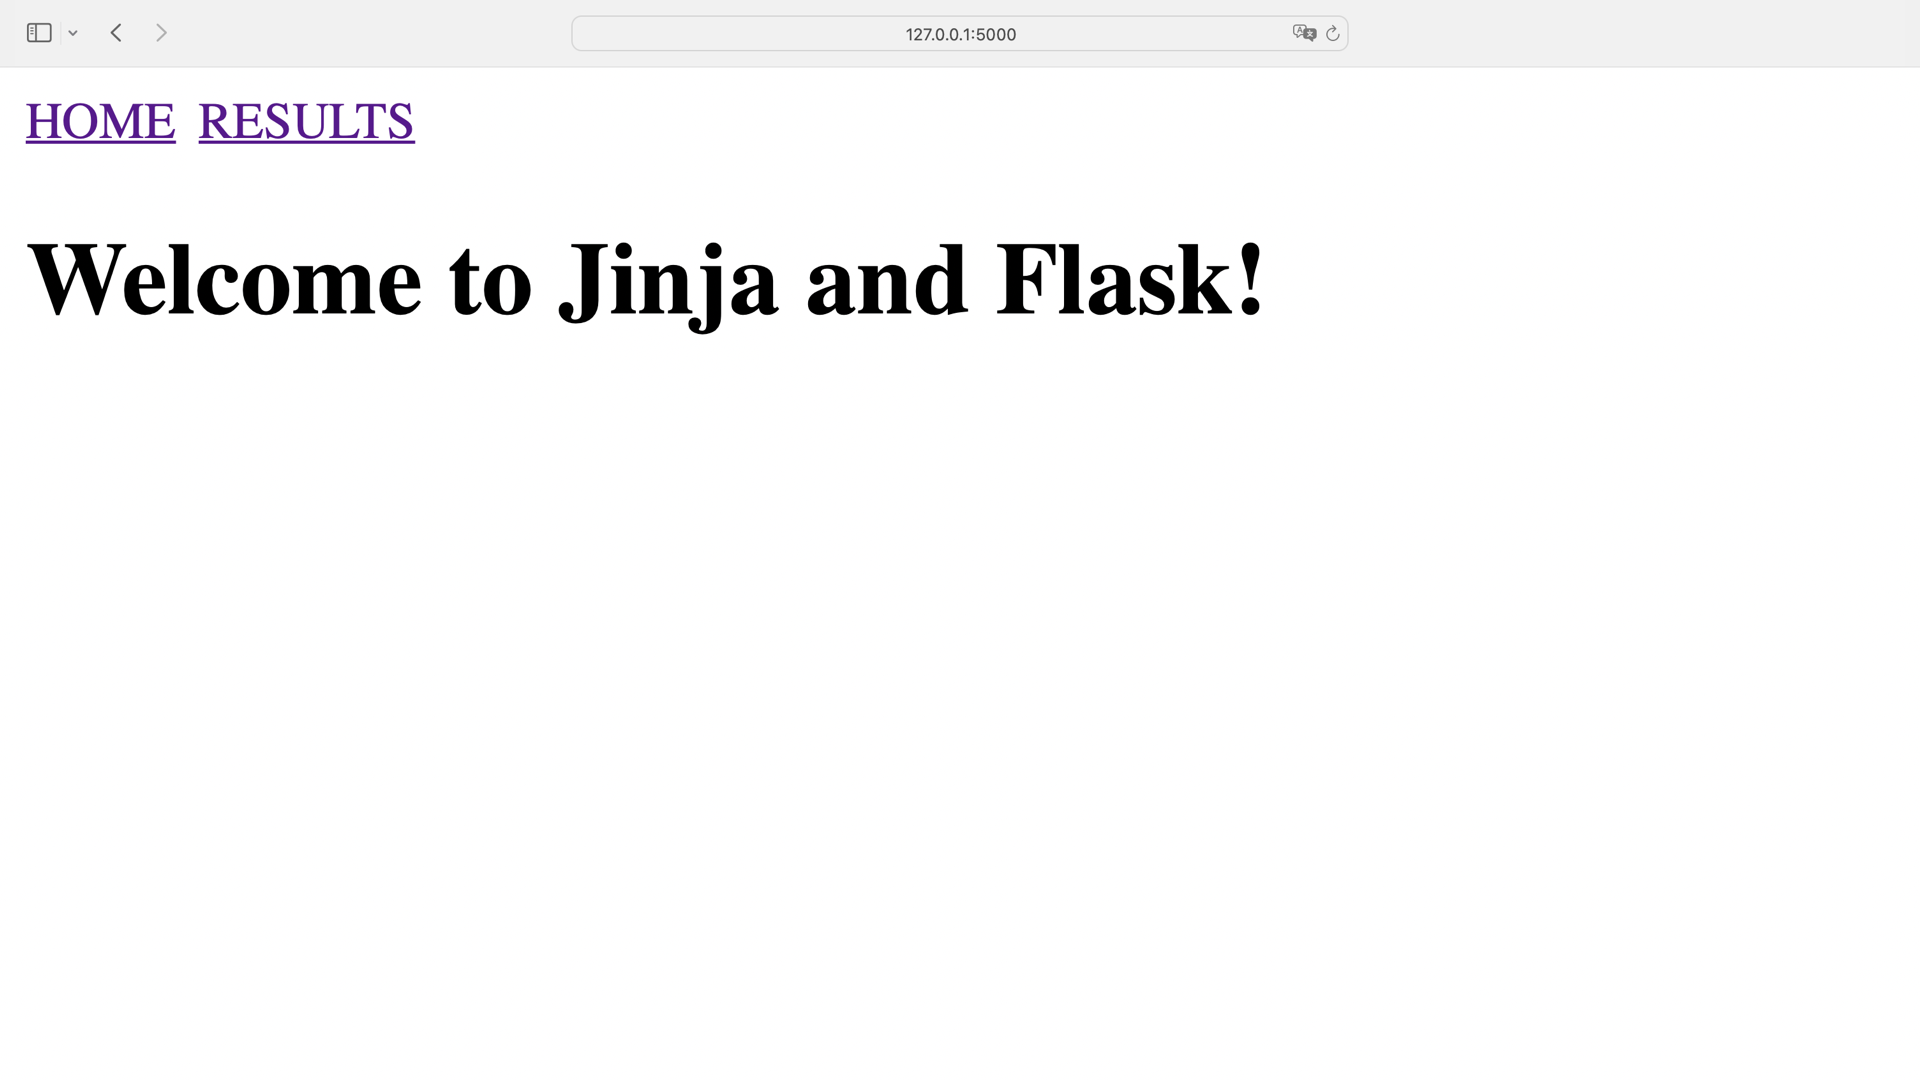
Perfect, the menu items are now in uppercase! You implemented the first feature on your request list. Time to tackle the next feature request.
Sort Your Results List
At the moment, your students’ results appear in the same order as you defined them in the dictionary in app.py.
You’ll use Jinja’s sort filter to sort the results list alphabetically by student.
Open results.html and add the sort filter to your for loop:
templates/results.html
{# ... #}

{% for student in students|sort(attribute="name") %}
  <li>
    {% if student.score > 80 %}🙂{% else %}🙁{% endif %}
    <em>{{ student.name }}:</em> {{ student.score }}/{{ max_score }}
  </li>
{% endfor %}

{# ... #}
The sort filter uses Python’s sorted() under the hood.
Your students iterable in results.html contains a dictionary for each item.
By adding attribute=name, you tell Jinja to sort students based on the values of name.
You can use the sort filter without any arguments when you want to sort lists of strings.
Go to http://127.0.0.1:5000/results and check out the new sorting:
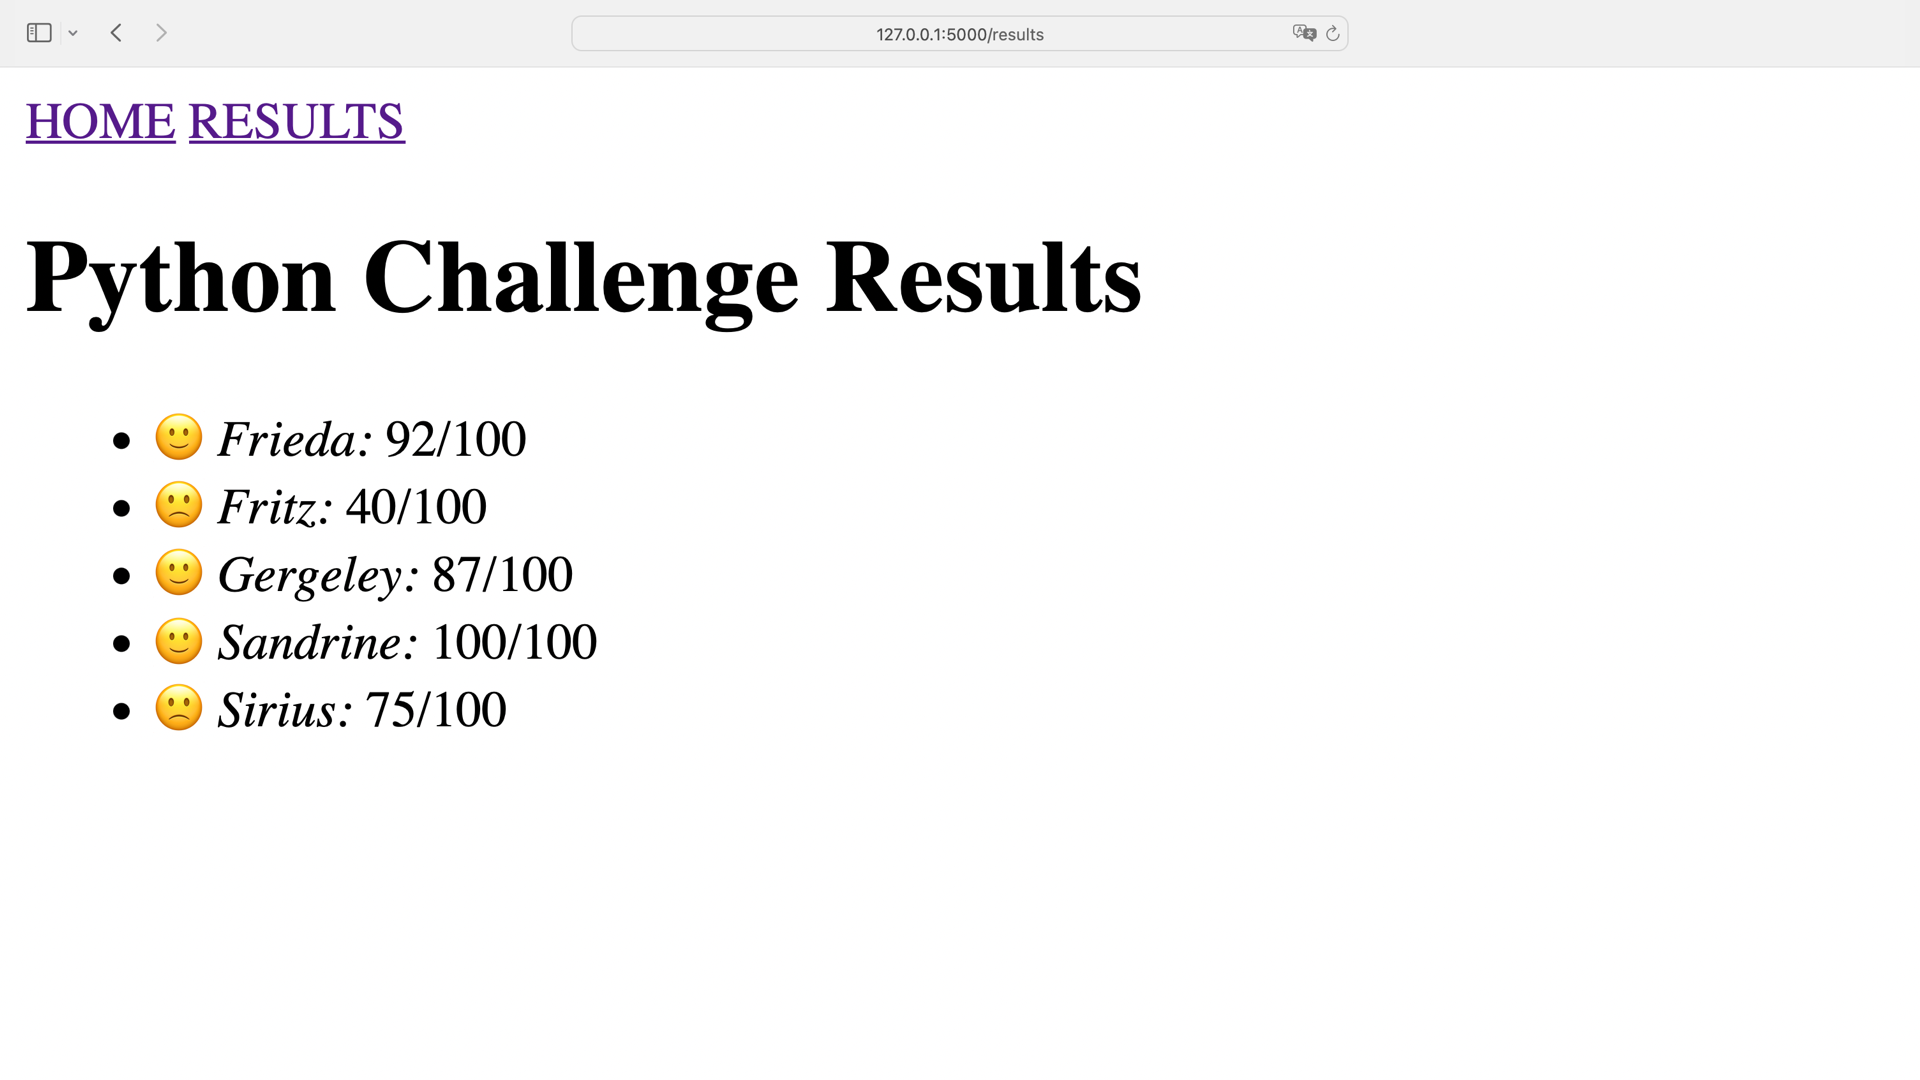
You used Jinja’s sort filter to sort the results of your students by their names.
If you had students with the same name, then you could chain the filters:
{% for student in students|sort(attribute="name")
    |sort(attribute="score", reverse=true) %}

  {# ... #}

{% endfor %}
First, you sort your students by name. If there are two students with the same name, then you sort them by their scores. Of course, students with the same name would actually need some differentiation beyond their scores, but for the purposes of the example, this sorting is sufficient.
You reverse the order of score to sort these students from highest to lowest score.
When your lines get too long, Jinja allows you to distribute your statements across multiple lines.
Note: In contrast to using Booleans in Python, you should write Booleans in Jinja in lowercase.
You use filters to transform data in your templates independently from your back end. When applying a filter to a variable, you can change the variable’s value for the user without changing any underlying data structure.
Check out Jinja’s filters documentation to learn more about template filters.
If you want to put even more logic into your templates, then you can leverage macros. In the next section, you’ll explore macros by implementing three more features in your Flask app.
Include Macros
When you include partial templates like a navigation menu, the included code is rendered in the context of the parent template without needing any adjustments. Very often, that’s exactly what you want, but other times you may want to customize the appearance of your included templates.
Jinja’s macros can help you create template partials that accept arguments. Like when defining your own functions in Python, you can define macros and import them into your templates.
In this section, you’ll add three more features to your Flask project:
- Implement a dark mode.
- Highlight the student with the best score.
- Mark the current page in the navigation menu.
Like before, you won’t touch any back-end code to improve your web app.
Implement a Dark Mode
For some students, a light-on-dark color scheme is visually more appealing. To cater to all your students, you’ll add the option to switch to a dark mode with light-colored text on a dark background.
Add a macros.html file to the templates/ directory:
templates/macros.html
 1{% macro light_or_dark_mode(element) %}
 2  {% if request.args.get('mode') == "dark" %}
 3    <a href="{{ request.path }}">Switch to Light Mode</a>
 4    <style>
 5      {{ element }} {
 6        background-color: #212F3C;
 7        color: #FFFFF0;
 8      }
 9      {{ element }} a {
10        color: #00BFFF !important;
11      }
12    </style>
13  {% else %}
14    <a href="{{ request.path }}?mode=dark">Switch to Dark Mode</a>
15  {% endif %}
16{% endmacro %}
You define a macro with a {% macro %} block that resembles a function definition in Python.
Your macro must have a name, and it can accept arguments.
For the light_or_dark_mode() macro, you must provide an HTML element name.
This will be the element that the CSS in lines 4 to 12 changes from light to dark.
To avoid serving a dark-themed website by default, you want to give your students the option to toggle the design.
When they add ?mode=dark to any route of your app, you activate the dark mode.
In line 2, you’re using Flask’s request object to read the request parameters.
The request object is present in your template’s context by default.
If the dark mode parameter exists in a GET request, then you show a link with the option to switch to the light mode in line 3 and add the style tag to the template.
Without any dark mode parameters, you show a link that toggles to the dark theme.
To use your macros, you must import them to your base template.
Just like with Python’s import statements, it’s recommended to put the {% import %} block at the top of your template:
templates/base.html
{% import "macros.html" as macros %}

<!DOCTYPE html>
<html lang="en">
<head>
  <meta charset="utf-8">
  <title>{% block title %}{{ title }}{% endblock title %}</title>
</head>

<body>
  {# ... #}
  <footer>
    {{ macros.light_or_dark_mode("body") }}
  </footer>
</body>
</html>
Depending on the GET parameters of a request, you render the dark mode and show a link to switch to the other color theme.
By providing body as the argument for macros.light_or_dark_mode(), your students can switch the color scheme of the whole page.
Visit http://127.0.0.1:5000 and play around with your color scheme toggle:
You can try providing "h1" instead of "body" to macros.light_or_dark_mode() and then reload the page.
Because macros accept arguments, they give you the flexibility to conditionally render parts of your templates.
Highlight Your Best Student
Another reason to introduce macros to your Flask project is to put some logic into its own compartment. Like nesting templates, outsourcing functionality to a macro can tidy up your parent template.
To highlight your best student with a star emoji, clean up results.html and reference an add_badge() macro:
templates/results.html
{# ... #}

{% for student in students|sort(attribute="name") %}
  <li>
    {{ macros.add_badge(student, students) }}
    <em>{{ student.name }}:</em> {{ student.score }}/{{ max_score }}
  </li>
{% endfor %}

{# ... #}
Note that you don’t import macros.html at the top of results.html.
You’re extending base.html, where you’ve already imported all macros.
So there’s no need to import them again here.
Instead of adding more code to a list item in results.html, you’re referencing macros.add_badge() inside your for loop.
You take the opportunity to remove the if … else condition that displayed a happy or a sad face emoji.
This code will perfectly fit the macro’s purpose of adding a badge to all students.
The add_badge() macro will expect two arguments:
- The current
studentdictionary - The complete
studentslist
If you visited your page now, you’d get an error because Flask can’t find the macro that you’re referencing.
Go on and add your new macro to macros.html:
templates/macros.html
 1{# ... #}
 2
 3{% macro add_badge(student, students) %}
 4  {% set high_score = students|map(attribute="score")|max %}
 5
 6  {% if student.score == high_score %}
 7    ⭐️
 8  {% elif student.score > 80 %}
 9    🙂
10  {% else %}
11    🙁
12  {% endif %}
13{% endmacro %}
Jinja lets you define your own variables inside of a template with the {% set %} block.
When you define variables, you can also add filters to their values and even chain them.
In add_badge, your’re defining high_score by first creating a list of all scores with the map() filter and then picking the highest score with max().
Both filters behave similarly to Python’s map() or max() function.
Once you know the highest score among your students, then you check the score of your current student against it in lines 6 to 12.
Visit http://127.0.0.1:5000/results and see your new macro in action:
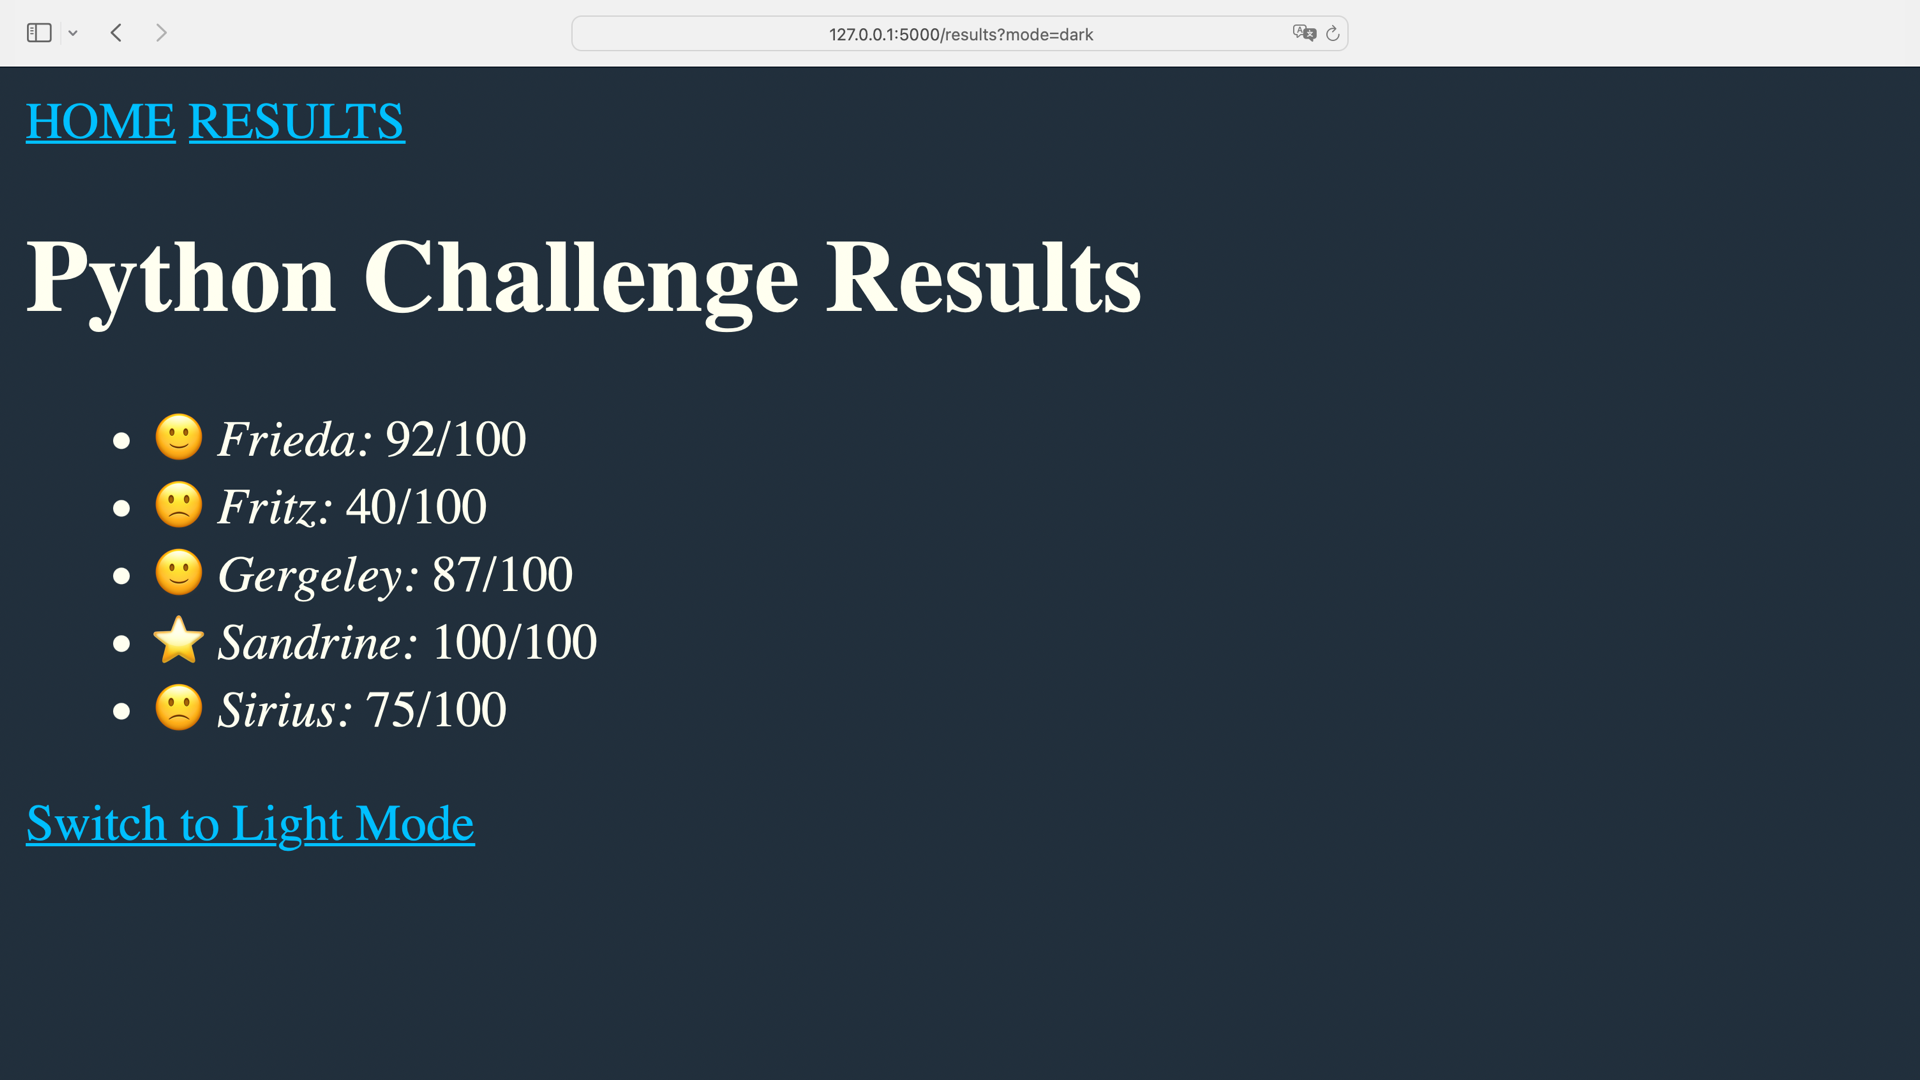
In addition to the smiling or sad face emoji that you showed before, you now display a star emoji for your best-performing student.
Mark the Current Page
The last feature that you’ll implement will improve your navigation menu. At the moment, the navigation menu stays the same on either page. In this section, you’ll create a macro that marks the menu item of your current page with an arrow.
Add another macro to macros.html:
templates/macros.html
{# ... #}

{% macro nav_link(menu_item) %}
  {% set mode = "?mode=dark" if request.args.get("mode") == "dark" else "" %}
  <a href="{{ url_for(menu_item) }}{{ mode }}">{{ menu_item|upper }}</a>
  {% if request.endpoint == menu_item %}
    ←
  {% endif %}
{% endmacro %}
Your nav_link() macro takes the menu item as an argument.
If menu_item matches the current endpoint, then your macro renders an arrow in addition to the menu item link.
Additionally, you check for the color mode.
If "dark" is part of the GET request, then "?mode=dark" will be added to the menu link.
Without checking and adding the mode, you’d switch to the light theme every time you click the link, because "?mode=dark" wouldn’t be part of the link.
Replace the menu item link in _navigation.html with your new macro:
templates/_navigation.html
<nav>
{% for menu_item in ["home", "results"] %}
  {{ macros.nav_link(menu_item) }}
{% endfor %}
</nav>
By adding the nav_link() macro to your navigation menu, you keep your navigation template clean.
You hand down any conditional logic to nav_link().
Visit http://127.0.0.1:5000 and have a look at all the features that you’ve implemented:
Macros are a powerful feature of Jinja. Still, you shouldn’t overuse them. In some situations, it might be better to put the logic into the back end instead of letting your templates do the work.
There will always be edge cases where you must decide if you add code directly to your template, defer it to an included template, or create a macro instead. If your template code wrestles too much with your data structures, then it might even be a sign that your code logic belongs to the back end of your app.
Conclusion
Jinja is a feature-rich templating engine packaged with the Flask web framework. But you can also use Jinja independently of Flask to create templates that you can programmatically fill with content.
In this tutorial, you learned how to:
- Install the Jinja template engine
- Create your first Jinja template
- Render a Jinja template in Flask
- Use
forloops and conditional statements with Jinja - Nest Jinja templates
- Modify variables in Jinja with filters
- Use macros to add functionality to your front end
If you want to put your newly acquired knowledge about Jinja into action, then you can build a front end to a FastAPI URL shortener or deploy your Flask application to Heroku.
You may also consider using Jinja as a template engine for Django. To learn more about the differences between Jinja and Django’s templating engine, visit Jinja’s documentation about switching from other template engines to Jinja.
Do you have other use cases where you leverage the capabilities that Jinja provides? Share them with the Real Python community in the comments below!
Frequently Asked Questions
Now that you have some experience with Jinja templating in Python, you can use the questions and answers below to check your understanding and recap what you’ve learned.
These FAQs are related to the most important concepts you’ve covered in this tutorial. Click the Show/Hide toggle beside each question to reveal the answer.
You use Jinja to create templates that dynamically generate HTML or other text-based formats by combining static content with data from your Python application.
A templating engine allows you to create documents by combining static templates with dynamic data, enabling you to generate web pages or other text-based content programmatically.
You create an if-else statement in Jinja using the {% if condition %} and {% else %} tags, followed by {% endif %} to close the block.
You create a for loop in Jinja using the {% for item in items %} tag, followed by {% endfor %} to close the loop block.
While Jinja is primarily used with Python, especially with web frameworks like Flask or Django, it’s a general-purpose templating engine that you can use in any context where you need to generate text-based content.
Take the Quiz: Test your knowledge with our interactive “Primer on Jinja Templating” quiz. You’ll receive a score upon completion to help you track your learning progress:
Interactive Quiz
Primer on Jinja TemplatingIn this quiz, you'll test your understanding of Jinja templating. Jinja is a powerful tool for building rich templates in Python web applications, and it can also be used to create text files with programmatic content.